Engage and connect your community through online & in-person events to allow members to interact, learn, and share experiences.
Events are created directly from the community. The back office is used to configure themes and categories and to access the events listing and participant exports.
Understand events
An event is a get-together organized for your community. For example, you can organize a workshop, a question-and-answer session, an in-store meetup, or a product webinar.
An event can be:
- Online, with a connection link for registered members.
- In person, with an address displayed on a map.
Each event includes: title, theme, category, start date, end date, time zone, format, capacity, image, and description.
Members can browse events, register or unregister, view the participant list, and comment on the event page.
Presets
- An admin must have already configured at least one event channel in the back office.
- Admins need the Edit other events permission to edit/delete events created by another colleague.
- To see the Add an event button, you need the Create events permission.
- Members need the Subscribe to Events permission to register for an event.
Events channel configuration
Events are displayed in dedicated channels. Learn how to set up an Events channel.
Events cards display the event banner, title, date & time, theme, category, location, participant count and event status. Members will be able to easily find and register for events.
Completed events still appear on the channel and can include a replay link for easy access to recorded sessions. If a replay is available, members can access it from the event page.
You can create several event channels and restrict access to them with the Access to channel permission.
Themes and categories configuration
Themes and categories help members find and filter events. Configure them before creating your first event.
- In the back office, go to Animation > Events > Themes.
- Click Add a theme.
- Enter a label.
- Save your changes.
Themes can include the main topics your events will cover (e.g., Beauty, Wellness, Home Decor, New product).
- In the back office, go to Animation > Events > Categories.
- Click Add a category.
- Enter a label.
- Save your changes.
Categories can include the format your events will take (e.g., Q&A, Masterclass, Workshop, Meetup).
A value can be configured either as a theme or as a category. It cannot be both.
You can edit or delete an existing theme or category from the corresponding list, by clicking on Update or Delete buttons.
Create an event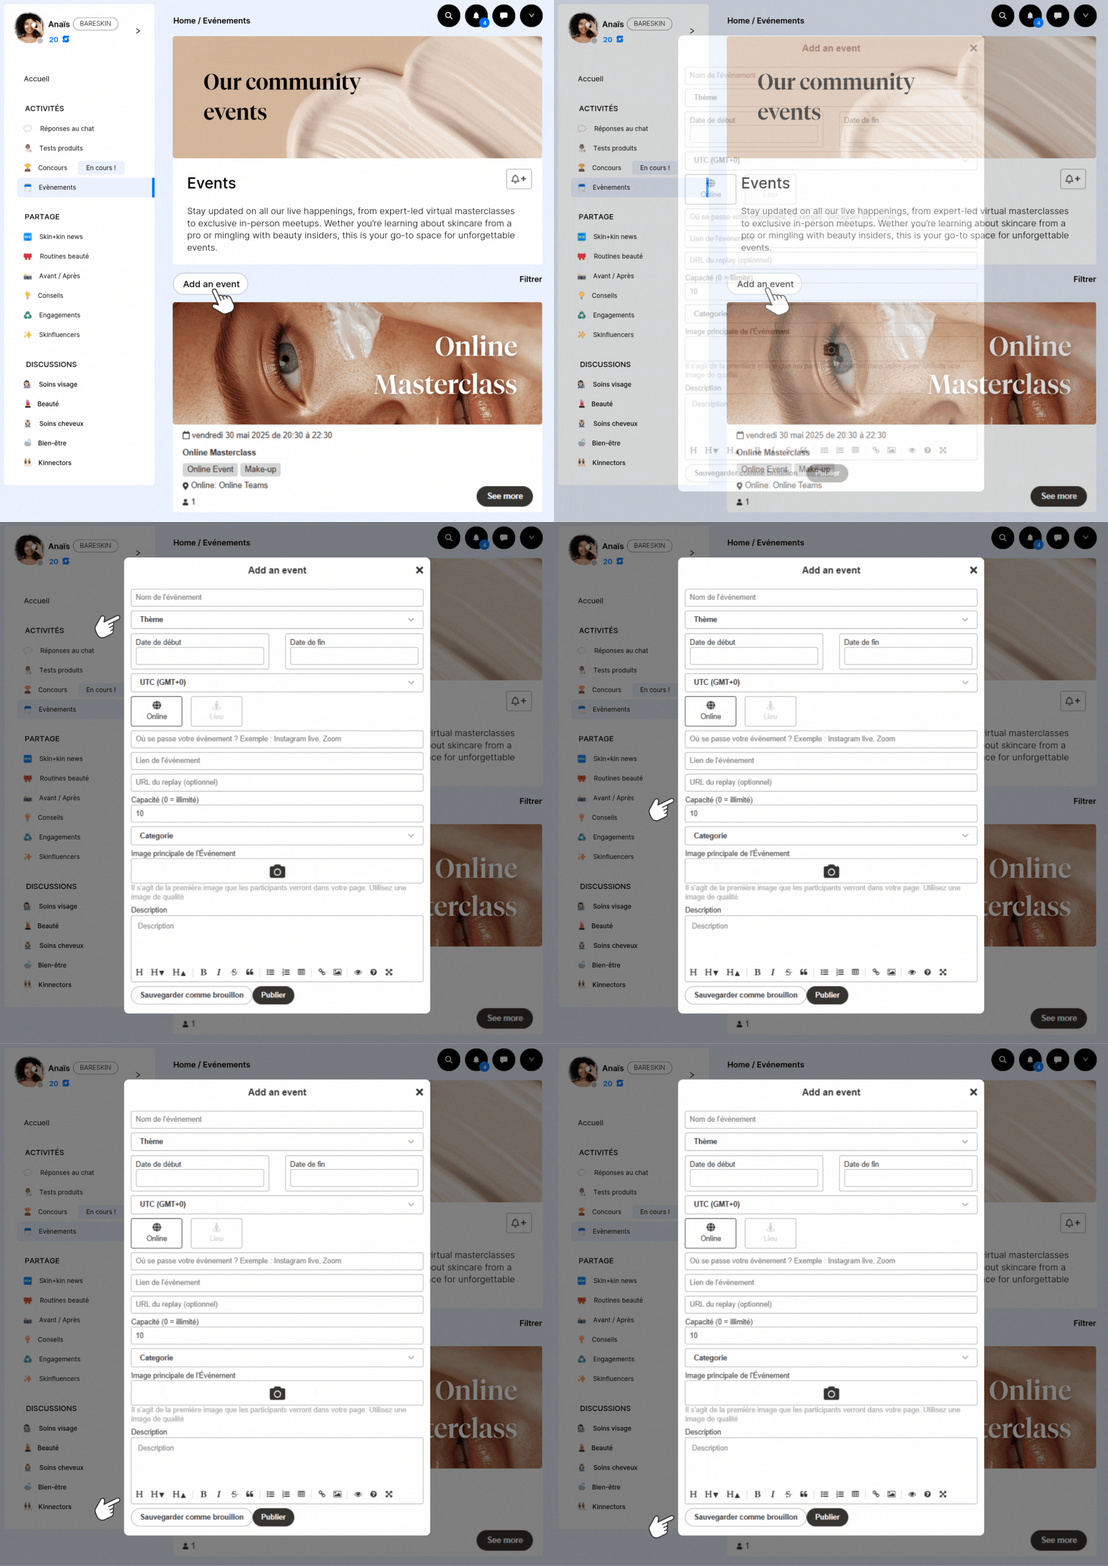
- Open the event channel directly in the community (not in the back office) and click Add an event.
- Complete the event form (each section of which is detailed below).
- Click Save for later or Publish.
Save for later: save the event as a draft, visible only to its creator and can be edited at any time.
Publish: event immediately visible on the channel.
Event form sections in detail
The name displayed on the event card, event page, and notifications.
A theme selected from the list configured in the back office (e.g., Beauty, Wellness, Home Decor, New product).
The dates and times determine whether the event is upcoming, ongoing, or past. The end date must not be earlier than the start date.
The time zone is used to display the event time correctly. When selecting a city-based time zone (e.g., Europe/Paris), the platform automatically adjusts the time based on seasonal changes.
Avoid choosing UTC (GMT+0): it does not follow seasonal time changes. The system will remain fixed at GMT+0, even after switching to daylight saving time. The event will be displayed with an incorrect time, requiring a manual update after the time change.
Example:
| Date | Action | Displayed time zone |
|---|---|---|
| March 20 | You create an event, with a start date set for April 3 at 6 PM. | Time zone selected: Europe/Paris (GMT+1). |
| March 31 | Paris switches to daylight saving time. | The Paris time zone changes from (GMT+1) to (GMT+2). |
| April 1 | Event automatically displayed in the updated local time, i.e., April 3 at 6 PM, adjusted for daylight saving time. | Time zone automatically updated to Europe/Paris (GMT+2). |
Select Online or In person.
- Online: Host virtual events by providing the platform name and a link for users to join (Instagram Live, Zoom, Teams,...).
- Location: For in-person events, specify location details, including the address and other relevant information. The address will be displayed on a map.
This field is optional. You can add a replay link after an event has ended. The replay must be hosted on your side or on the platform of your choice, such as YouTube.
- Open the completed event and click Edit.
- Paste the video link into Replay URL.
- Save your changes.
If you did not create the event, you need the Edit other events permission to add or update the replay link.
Capacity: Enter the maximum number of seats. Enter 0 for unlimited capacity.
Companions: This option is disabled by default. The companions option allows a registered member to bring guests, such as family members, friends, or colleagues to the event:
- Enable Allow companions.
- Enter the Maximum number of companions per member.
- Save or publish the event.
Each companion uses one additional seat. The participant count therefore includes registered members and their companions. For example, if 40 members register with 10 companions in total, the event count is 50 participants.
If there are not enough seats for the requested number of companions, the member cannot complete the registration. The event page displays the number of seats remaining. A registered member sees the number of companions linked to their registration, for example You're registered (+2).
The maximum number must be a whole number greater than or equal to 1. It is set to 1 by default when the option is enabled. You can edit the companions settings for a draft or published event:
- If you reduce the maximum number of companions below the number already used by some members, the platform displays a warning. You can confirm the change.
- If you reduce the total event capacity below the number of seats already taken by members and companions, the change is blocked.
A category selected from the list configured in the back office (e.g., Q&A, Masterclass, Workshop, Meetup).
- The image displayed on the event card and at the top of the event page.
- The description is displayed on the event page, to add information about the event. Text formatting is available.
All fields are required to publish an event, except the replay link.
Manage events
In Animation > Events > Overview, admins will find the listing of all events created on the platform, regardless of their channel. They can search an event thanks to the search bar.
Events are sorted from the most recent to the oldest. The listing displays the event ID, title, dates, category, and participant count. The participant count includes registered members and companions.
Sending event emails
The platform can automatically send the following event emails to registered members:
- Registration confirmation after a member registers.
- Event reminders twenty-four hours and one hour before the event starts.
- Event cancellation when an event is cancelled.
You can manage these emails from Configuration > Look & feel > Emails.
- Select the email from the drop-down menu.
(EventConfirmationRegister, EventReminder24Hours, EventReminder1Hour or EventDelete) - Enable or disable the email thanks to the toggle.
- Send a test email if necessary.
- Save your changes.
Export participants
In the events listing, click on Export participants for the relevant event. You will download a CSV file including:
- User ID
- Nickname
- Number of companions
The participant export is replacing the previous Power BI Registration list report. Each export creates a log entry in the back office for traceability.
Understand event statuses
- Draft: The event has been saved but not published. It is visible only to its creator.
- Upcoming: The event has been published and its start date has not been reached.
- Ongoing: The current date and time are between the event start and end dates.
- Past: The event end date has passed.
- Sold out: The maximum number of capacity has been reached.
- Replay available: The event is past and a replay link has been added.
Register for an event
Logged-in members with the Subscribe to Events permission can register for an upcoming event.
If you are the event creator, you cannot register for your own event, as you are already considered a participant.
Required fields when registering for an event
When a member registers for an event, the registration confirmation form asks for their first name and last name. Both fields are required to complete the registration.
The fields are prefilled with the information used during a previous event registration. Members can:
- Update this information before confirming a new registration, or from an existing registration until the event starts.
- Edit their first and last name from their profile.
- Cancel the registration flow instead of providing their first and last name if they don't want to. The registration is not created until the form is confirmed.
Prevent registration conflicts
The platform helps members avoid signing up for two events that happen at the same time.
When a member tries to register for an event that overlaps with another event they are already registered for, a warning appears instead of the usual confirmation. The warning shows which event conflicts and offers two options:
- Cancel the other registration to free up the slot and confirm the new one.
- Go back to the event page without changing any existing registration.
Registration status
The registration button changes depending on the event status and capacity:
- Register allows a member to register.
- Unregister allows a registered member to cancel their registration.
- Sold out is displayed when the maximum capacity has been reached.
- Watch the replay replaces the registration button after the event when a replay link is available.
The event page displays the number of registered participants and a preview of their profile picture. Members can open the full participant list when available.
Register with companions
When companions are allowed, the registration form displays the maximum number of companions configured for the event. Members can select the number of companions they want to invite to the event.
If a member reduces the number of companions, the companions with the highest numbers are removed first. For example, reducing the number from three to two removes companion three and keeps companions one and two.
Edit or cancel a registration
Members can edit their own information and their companions' information until the event starts.
When a member cancels their registration, their companions are removed from the event and the participant count.
Best practices
- Check the start date, end date, and time zone before publishing.
- Use consistent themes and categories to make filtering easier.
- Add the replay link shortly after the event.
- Set the capacity according to the room size or online connection capacity.
- If companions are enabled, consider their number when setting the event capacity.
- Use event integrations: dynamic homecards, post, mission, weekly digest email,...